Representation Of A Person
What is a portrait ?
" a painting, drawing, photography, or engraving of a person, especially one depicting only the face or head and shoulders, portraits have always been ore than a record; they have been used to show power, importance, wealth, virtue, beauty and taste "
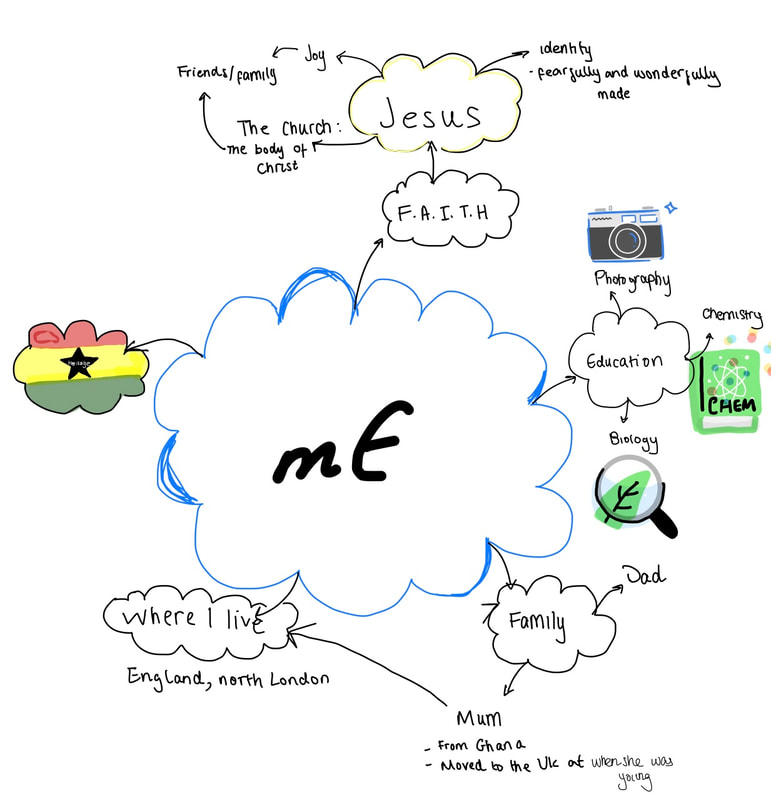
M E - mindmap
The Selfie
What is a selfie
The selfie otherwise known as a self portrait is a genre inherited from painting, used as a new way to take photographs; of people, close ups of ourselves etc on phones and other smart devices. This technique, has widespread through the world since being popularised by various social media platforms and it's users.
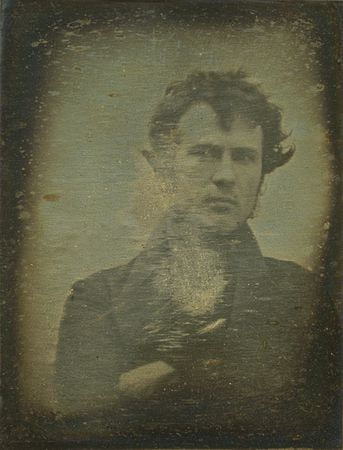
The First Selfie 1839
Robert Cornelius took the first ever "Selfie" in 1898 however surpassingly this was a common practise during the early days of photography exploration and invention as it was easier for experimentation purposes. It also allowed the photographer to put himself in the position of the model in order to gain a new perspective in his work
The Reflected Selfie
Duane Michal - MICHALS magic mirror
Duane Michal is an American photographer known for creating narratives with series of images, however for this project "Michal's magic mirror" is what drew my attention. The technique of elongating the subjects face in the mirror or distorting it interested .
n my response I experimented in different settings like the car and the train with different reflective surfaces to achieve the distorted and elongates images Duane had. I used smaller surfaces like a tea and table spoon, shiny silver paper where some of my face was cut out or spaced out etc. I also decided to experiment with spoons of different shapes ( like ladles) , sizes and angles, seeing how my face would change. In some cases my face was upside down, elongated or similar to that of a fish bowl like Ben Nathan's pinhole work. In one image two tea spoons were used, in order to show the varying angles. Some images were blurry however the objective of distorting the face was achieved.
n my response I experimented in different settings like the car and the train with different reflective surfaces to achieve the distorted and elongates images Duane had. I used smaller surfaces like a tea and table spoon, shiny silver paper where some of my face was cut out or spaced out etc. I also decided to experiment with spoons of different shapes ( like ladles) , sizes and angles, seeing how my face would change. In some cases my face was upside down, elongated or similar to that of a fish bowl like Ben Nathan's pinhole work. In one image two tea spoons were used, in order to show the varying angles. Some images were blurry however the objective of distorting the face was achieved.


The Obscured Selfie
Patrick Rochon
For this style of portraiture I was inspired by the innovative style of Patrick Rochon. Patrick Rochon is a Canadian light painter influenced by the likes of Gjon Mili and Manray early light painters. In 1997, Rochon fully dedicated himself to the exploration of light painting . I felt as though his work, depicted obscured portraiture in an unconventional way.
For my images, I went into the darkroom with the safety light on, (red background) and then I set my camera to "BULB" on shutter speed. When I was shooting, this meant that the camera would capture movement with long exposures. I also included different colours, with one or two models doing movements. As well as light painting, due to the movement the faces in my images were also blurred or slurred which fits into Rochon's theme of how with light you can create illusions of multiple faces etc.
For my images, I went into the darkroom with the safety light on, (red background) and then I set my camera to "BULB" on shutter speed. When I was shooting, this meant that the camera would capture movement with long exposures. I also included different colours, with one or two models doing movements. As well as light painting, due to the movement the faces in my images were also blurred or slurred which fits into Rochon's theme of how with light you can create illusions of multiple faces etc.


The Shadow Selfie
Vivian Maiers
Regarding, shadow photography Vivians Maiers 1975 series drew my attention the most. I found thats she played with shadows in colours and nature alot and I wanted to replicate this same mysterious yet beautiful effect. In my response I tried to vary the plants I went to and the colours, and took pictures both in the day time on a sunny day and at night with flash light lighting.


Character Recognition
M Y R A G R E E N E
Myra Greene is an African-American photographer who debuted her artistry on a piece which was centered around recognition and who she was in that recognition. Was she primarily recognised for her race ? gender ? features ? How did an outsider recognise and associate their recognition with her; and or how does this relate to wider issues.
Noticeably in Myra's photographs, they were quite small scale and focused on one or two features at a time similarly to a mugshot perhaps. Her work reflected the way in which slaves where chosen by bidders during the slave trade, where there would be several analysis' of ones teeth to conclude if they were strong, the thickness of the lips or the wideness of their noses etc ; and from this a decision was made on whether the slave would do profitable work. In replicating this history, Myra Greene pushes us to question if we still make these generalised judgments and see the feature more than the person.
Additionally, around the time of Greene's exploration , hurricane Katrina also occurred which impacted a lot of people of colour. This forced Greene to also consider further how she was seen, and she was treated because of this type of recognition.
To achieve this Greene explored a unique technique called collodion ambrotype photography from the 1850's , with cyanide and wet collodion glass. The simplistic outcome using this process, contributed towards Greene's goal for the audience to focus on just the features being shown and the emotions if any in the images.

|

|
My First Response * u n e d i t e d i m a g e s *
In the first task I had to take close range images, imitating Myra Greene's style. I used models with different distinct features I could focus on ( whether that be eyebrows, skin texture and or freckles ) and could enhance in the later stages. After several takes, I selected images varying from one feature in the picture to two or three features in one image. During the process I used a black back drop and 2 studio lights to enhance the models features and quality of the photograph.
Teachers comments : I have changed the order because you need your raw images first THEN the edits. You put work on your weebly in the order you do the work.
WWW: I successfully captured features such as their freckles, eyes, lips etc within a close range to contribute towards the goal of emphasising texture and the ' Greene ' effect
EBI: I could have used the focus tool more in order to show more clarity in my images
EBI: I could have used the focus tool more in order to show more clarity in my images
My Second Response * s e l e c t e d e d i t s *
I selected some images I had taken from task 1 and then edited them in photoshop by putting a grayscale on the images and then playing with the colour tones of each model. For fairer skin tones I adjusted the red, blue and yellow hues in order to get a dark image overall but enhance their eyes, freckles and any texture. For darker tones, I adjusted the red and the yellow tones to darken the whole image drastically; to focus on the texture mainly and certain highlights on the temples of the face and or lips. Additionally, I used the curves feature to adjust the shadows and highlights, changing the images tonal range.
Photoshop BTS
Emma Image 1
I adjusted all the tones, especially the red and the yellow on the black and white tool, in order to achieve the darker look in certain places like her nose and freckles aswell as the frown lines. I then used the curve tool adapting two parts of the curve. I put the first point at 32 (input) and 9 (output). For the second curve I chose 112 as the input and 120 as the output.
I adjusted all the tones, especially the red and the yellow on the black and white tool, in order to achieve the darker look in certain places like her nose and freckles aswell as the frown lines. I then used the curve tool adapting two parts of the curve. I put the first point at 32 (input) and 9 (output). For the second curve I chose 112 as the input and 120 as the output.

|
|


Matt Image 1
In this image I layered the black and white tool twice. In the first layer I grayscaled the image quite generally in order to have a nice base which I could then texturize in layer 2. In layer 2, I turned the red and cyan tones all the way down to -200 in order to darken the image overall, but in particular his eyes, freckles and and his clothing ( to allow the focus to be on his face) . I kept the green quite central at 39 to add as a highlight to parts of his eyes and his face where there were veins present or just green undertones. I kept the magenta and blue undertones quite central as well. This allowed the image to be black and white overall but have certain features standout without being overbearingly dark.
In this image I layered the black and white tool twice. In the first layer I grayscaled the image quite generally in order to have a nice base which I could then texturize in layer 2. In layer 2, I turned the red and cyan tones all the way down to -200 in order to darken the image overall, but in particular his eyes, freckles and and his clothing ( to allow the focus to be on his face) . I kept the green quite central at 39 to add as a highlight to parts of his eyes and his face where there were veins present or just green undertones. I kept the magenta and blue undertones quite central as well. This allowed the image to be black and white overall but have certain features standout without being overbearingly dark.

|
|


Charisse Image 1
I initially used the black and white tool to gray-scale the whole image and kept the settings quite central. Then I layered the tool a second time but this time focused more on darkening my red tones at -45. This allowed me to create highlights and shadows which was helpful when I used the curve tool. Shortly after I experimented with the curve tool with an input of 98, which completely darkened the picture to quite an extreme hue, but the texture and highlights on my face were still visible due to the black and white tool previously.
I initially used the black and white tool to gray-scale the whole image and kept the settings quite central. Then I layered the tool a second time but this time focused more on darkening my red tones at -45. This allowed me to create highlights and shadows which was helpful when I used the curve tool. Shortly after I experimented with the curve tool with an input of 98, which completely darkened the picture to quite an extreme hue, but the texture and highlights on my face were still visible due to the black and white tool previously.

|
|


Edited Images


WWW : I successfully edited the selected images adapting to their skin shades, features and textures
EBI : During the shooting process for some of the images I should have focused the camera more so that during the editing process the refinement would remain; due to lack of refinement in some of the original photos I had to compromise on using certain editing tools as the picture would have lost it's quality
EBI : During the shooting process for some of the images I should have focused the camera more so that during the editing process the refinement would remain; due to lack of refinement in some of the original photos I had to compromise on using certain editing tools as the picture would have lost it's quality
Home Task
Family Recognition
In this task I took several images of my mother, behind a black back drop and used a white light to help focus on her features. We experimented with different poses, where she looked directly at the camera, or she had her mouth open in an attempt to try and recreate Myra Greene's poses. I later edited the image often with just the black and white tool. However on the lips image I used the curve tool to really focus in on the texture of her lips.


Edit’s


WWW: I took a variety of pictures focusing on different parts of the models face
EBI: I would have asked the model to make more expression whether it be looking straight at the camera, etc as Myra Greene's image always portray a sense of emotion with subtle expressions
EBI: I would have asked the model to make more expression whether it be looking straight at the camera, etc as Myra Greene's image always portray a sense of emotion with subtle expressions
My Third Response * d a r k r o o m e x p e r i m e n t *
During this process, I had two selected images printed in acetate film as a base material in order to make a sandwich print. I started out using test stripes placed in-between the image and put it on the enlarger surface. I then : adjusted the enlarger light size and focus whilst the safety light was on, set the timer to one second intervals, placed a large piece of glass over my image to prevent movement and then I used black card to expose the image at different times. After the whole image was exposed, I put my test stripe through the whole developing process, *developer, stop and fix* and then decided for each image which exposure time would be best. I chose an exposure time of 2 seconds for Image 1 ( Emma ), and an exposure of 5 seconds for my lips (Image 2).

|

|

Following on from the test stripes, I used the selected exposure times on larger pieces of photographic paper to see how it would come out without any other techniques used (chemigrams, tape etc ). I found that even though I had successfully picked the right exposure times, I had to be very careful in the developing process because if I left it in the developer for too long it would get took dark so I began to find a pattern that allowed my pictures to be dark overall but still clear.
After this I began to experiment with chemigrams as well as tape placing it rigidly around the edges of the paper and or in the middle and then painting developer around the edges of the tape and on the tape itself. The chemigram process followed as : placing the curved and textured piece of tape around the edges, putting the image through the full photographic process and then taking off the tape exposing it to light outside of the darkroom , then afterwards putting it through the whole process a second time. This had a unique and diverse outcome however I noticed that the image gained a yellow and gradually pink hue as seen below due to the tint of the tape.
To avoid this, whilst experimenting I began to find new techniques. In this new technique I put tape on my images and if it was double image (across two pieces of photographic paper) I also put tape in the middle which added to the effect. Then I painted around the edges of the tape with developer and around the image in general. When the edges began to develop I placed the whole image in the developer with the tape on, and took it through the whole developing process. In the fix stage I removed the tape instead of removing it afterwards in order to avoid any yellow or pink hue and then put it back in the fix. I found that this technique had a similar outcome to the chemigram if not better and allowed my image to be black and white just like Greene’s work .


Final Response

|

|
Teachers comments : These are great- you really persevered with the printing! Don't forget the process, test stripes, mini images and bts
WWW: I adapted my actions particularly in the developing stages in order to achieve a successful image in the end and was able to create a system that enabled me to create the look on my image i preferred, from darkness, shadows and light etc
EBI: I could have done more images of the lips as there seems to be a uneven distribution of the trial images
Light and Shadow
Valerie Kabis
When light is supressed, how can this alter the facial structure and reduce a models face to just shapes and shadows . This was Kabis' photographic ideology and through her work she explored this theme, experimenting with low shutter speeds, aperture as well as directing the models in such a way, where they appeared to be fluid like or mysterious.


Stemming from Kabis' work, our first task was to recreate these same heavily shadowed images. To achieve this, I used a black backdrop and a studio light, there was also a tungsten light involved. We also used several mobile phone flashlights to add shadow in various places. For the fourth and eighth image, it was actually shot in the dark room using the camera on BULB for shutter speed. This allowed the subject to move in one frame, causing this trail of light similar to Kabis' work.
Digital Work


unedited selected images
For the second task, I selected a few of my images and then edited them in photoshop to enhance the photos, and try to truly cultivate Kabis' style. Generally, i grayscaled the images, then i interchangeably used the features : levels, and brightness & contrast. This helped me to create that exaggerated contrast between the face being extremely pale white and the background being pitch black. For some of the images in the background, at the end I went in with the brush tool, to make sure it was a clean and consistent black colour so the photo would be more crisp.


edited selected images
WWW: I successfully experimented with different shadow angles to create different images
EBI: Next time I would take more photos and of different people, so I would have more images to choose from and more variation
EBI: Next time I would take more photos and of different people, so I would have more images to choose from and more variation
Continuous Lighting
Light can make impactful changes to peoples face and the image taken. In this project we explored different types of lighting.
Natural light
In the first task, in order to capture natural lighting shots, my partner and I went outside and stood behinds various backgrounds. It also helped that it wasn't a sunny day, therefore the picture was more balanced in terms of shadow and natural lighting rather than sun coming through in the image


Studio lights
The next experiment was using studio lights. In these images, we used three studio lights varying which lights were on in order to create the effect below i.e main light, fill light and main light, hair, fill and main light. Main light is when there is a studio light just above the subjects head. The fill light is a less intense light, so in combination with the main light, fill works to fill in any shadows. Then Lastly, the hair light is creates light on the head and overall the face.
|
hair, fill and main light
|
fill and main light
|
main light
|


WWW: The pictures were of high quality and you can see the change in lighting form main main, fill and hair
EBI: Next time I would take more pictures
EBI: Next time I would take more pictures
Tungsten light
Here I used both the natural tungsten light which has a soft orange hue and or orange paper to create a filter over the light depending on the models features. For example, for the main image below I used the orange artificial paper as a lens, in order to accentuate her eyes and ginger hair swell as the overall tungsten effect. In the slide show, I chose the best images I had, along with other images for variation purposes in order to show how the light differed depending on the person, skin tone and features.
WWW: I varied the tones of the tungsten light, where at some points it was very strong and at some points there were some blue undertones; I adapted the light based on the subjects as I felt for example when it was very strong in the first picture the subjects hair and eyes became more vibrant adding to the effect
EBI: I would a wider variation of subjects because the images I picked only show two people and how the light looks on them
EBI: I would a wider variation of subjects because the images I picked only show two people and how the light looks on them
Playing with C o l o u r and L i g h t
In these images I used gels to change/filter the initial tungsten light. In some images there was a mixture of two gels for example red and blue, or green and blue. This allowed certain features of the models to be excentuated for example the green gel enabled Emma's (image 3) eyes to stand out, in conjunction to the blue gel. Below the slideshow, I included the various images i initially took but that didn't make the cut.


WWW: I experimented with strong colours and also mixed gels
EBI: Next time I would venture outside of primary colours so mixing gels to get a completely different colour not just shade or ombre for example purple
EBI: Next time I would venture outside of primary colours so mixing gels to get a completely different colour not just shade or ombre for example purple
BIG UP
Ben Watts
Big up is an impressive array of portraits featuring rappers, actors, boxers, dancers, children and other street characters. London-born photographer Ben Watts started this collection in 1990 when he came to New York form the Sydney College of Arts. During his time in New York, the vibrant and strong personalities reflected in the landscape caught Watts, and sparked his artistic flare. Ben usually shot commercial images, so this new genre was something he hadn't explored before. Big Up, uses mixed media, vibrant backgrounds and sentimental words or annotations.


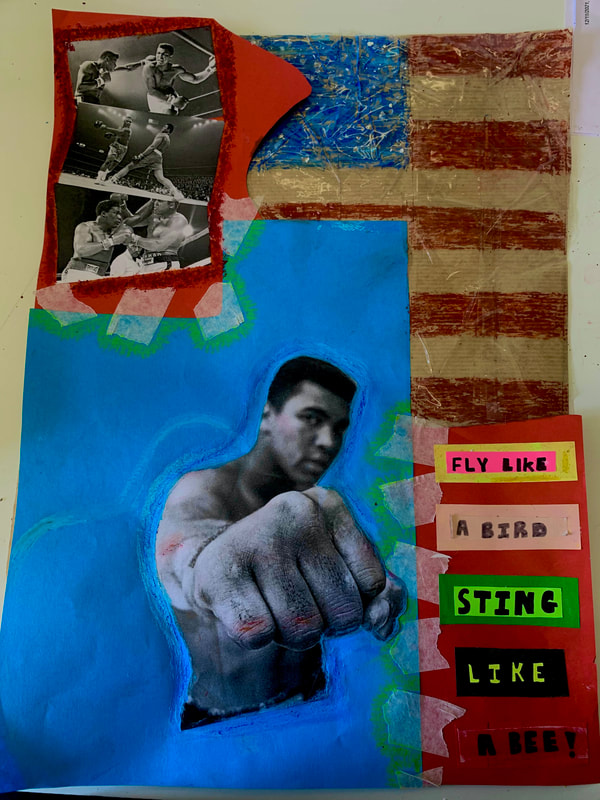
In response to Ben Watts "Big Up" project, the first task was to use boxer Muhammad Ali as the subject to create a colourful collage. We also had the option to incorporate many of Ali's political statements and times in his life for example when he refused to be drafted into the war. I started off with two block colours, red and blue and then built off of the background. Then i was inspired by a stack of colourful books I saw on google related to the project and decided to cultivate this idea on my project, and attempted coined Ali's statement "Float like a butterfly, sting like a bee". After this, i experimented with tools such as clear tape, oil pastels and glue. I used oil pastels to outline pictures and then i used glue to add sheen to where i had placed the pastels. i roughly used the tape in the space that was remaining, to create texture and layers. Then ontop of it i drew the American flag, with oil pastels using different shades to create subtle highlights. I then re-layered clear tape onto to give that section a glossy appearance.

|

|
The second task was to respond to Ben Watts Big Up project but this time it was about what our lives looked like in 2021. So in my response I collaged many things that make up who I am. I lived in Finsbury Park more or less all my life up until recently and so used white paper to add contrast and wrote Finsbury Park, similarly to the style in which Ben Watts did it above. I also intentionally left some of the holes untouched foe example in the "B", to add an animated effect. Then my background was the Ghana flag , which I am from. Then along the side I mounted strips of film onto sticky note tapes to stick down pictures, of my friends, family, faith ...crocs and me. Then in the middle, I mounted three big images onto one another, one being myself, another being my Pastor who has impacted my life tremendously by teaching the Word of God to us in such detail #PDAK. Lastly, the most impactful change in my life and in 2021, was getting saved (not aimless, relationshipless religion as I had known it before) but the beginning of an ever-growing relationship with Jesus through the bible, fellowship etc . His gift of eternal life I accepted in 2021. I finally mounted this whole piece onto a reflected piece of card to add to the final touches.

|
WWW: I used mixed media like Watt's work, and made an effort to make sure every element of my collage was cohesive and not overbearing
EBI: Next time I could use smaller paper for my base, so that all the elements can be more concentrated
EBI: Next time I could use smaller paper for my base, so that all the elements can be more concentrated
GEORGE . TOWN
L E W I S KHAN

|
|
Lewis Khan is a fine art and commercial photographer from London born in 1990. Khan regularly works with still and moving images, and often studies emotions, relationship and identity in the work. George Town, filmed in 2017 is one of Khan's bestowed projects he commemorates each year. George Town is a visual story told by the south London resident George, who had built a casual rapport with Lewis over Lewis' childhood. Khan once said that "During a period of my adolescence that saw playing football in the street as a daily ritual, George and myself often shared the same space. Frequently we would meet with a simple nod, more frequently a hello, and on occasion George would join in for a kick about. Georgetown is informed by six years of these impromptu and informal meetings in the street, usually the same one. " His frames above, align with his phrase A friend, a neighbour, a familiar face in the street. As George images were taken on the street and his area as well as his home. This humanist theme was also translated in the film as the viewers were taken on an in-depth and personal journey, from George's familial life, to what he regularly made in the kitchen, to where he would venture to outside ; and even a sentimental intervention with his stuffed animals. In this film, I believe Khan wanted the viewers to consider the theme of partiality, and giving us an insight of people we otherwise might have overlooked gave us the opportunity to truly listen and see and listen to people like George, as opposed to making presumptions. From the very start we were introduced to a very fast George who enjoyed speaking about his mother and the impact she had on his life
In this film George doesn't just speak for himself, he shows us who he's connected to and how many in south London in 2017 lived like this. Through the film, it enabled the viewers to see wider issues like "the forgotten part of society". Half way through George began talking about how he could no longer contact his mum and daughter, and that both him and his friend would want a companion because of how lonely it gets. George said " Theres no one in here to talk to Lewis, all I'm doing is banging my head with music and still not going nowhere."
"This is where I heal my wound"- he said referring to his friends the stuffed animals Gloria, Tony, Ivy, Pat and many more which is all George had "there the only people I got to talk to really, when everyones gone thats it ". This made me think about the circumstances of George and how passive and more or less okay society is with the state of George. As long as he pays his bills, there would be no harm expect for his excessive drugs use which society wouldn't care about but rather look down on him for. Khan was interested in this issue because it was important for us to consider within our own lives where we show partiality and fuel the fire, a smile, a nod or sometimes a wave could go along way but partiality often blocks these acts of kindness from being expressed.
Lewis Khan has used film, where the audio was continuously playing and then an overlay of Georges objects, surroundings etc to allow the viewer to easily connect the dots. This creates a more in depth sentimental effect especially where George was talking about his stuffed animals or where his daughters name was written on the toaster, you can see the heart felt intentionality of what he would call home or "where he heals"
|
Georgetown from lewis khan on Vimeo. |
Task 1 - Home
For this task I took several pictures of my mother, her environment, her sentiments and adventures we embarked on as part of my development project. I captured attires from her homeland Ghana, for example "Obaatan Na Enim Dea Neba Bedie - It's only a mother who knows what and how to feed her children" . The black and white attire depicts the mother eagle is giving her babies food, and it goes out to find food for her children because only a mother would know what to give her child. The hearts also show the unmatchable love of mothers. This attire is usually worn, to celebrate mothers, birthday, mothers day etc. I also had pictures sent from her sister in Ghana of when they was very young. We then visited a Ghanian restaurant in the heart of Tottenham called Waakye joint; we spoke to the owner and they bonded over the profound childhood experiences of Ghana. I took a picture of my mum's bible of which helps her spiritually with her relationship with Jesus Christ. Lastly i took pictures of my mum in the car and in the garden as she goes out into the garden where there is fresh air to relax often.
Task 2 - different environments
For this task, we had to go around the school capturing different environments and people, for example the lunch ladies, IT technicians etc. For some of the images, I slightly edited turning the black point up and the exposure down in the camera app.


WWW: I had an appropriate selection of images i wanted to use aswell as many normal shots
EBI: Next time I would make sure my camera is in auto-focus at all times to keep the image as sharp as possible
EBI: Next time I would make sure my camera is in auto-focus at all times to keep the image as sharp as possible
Final Task - Development project based off the work of Lewis Khan
KRYSTA - a film production
Initially, I planned to film a Lewis Khan inspired documentary. However, after much consideration i decided it would be best to use this idea for my development project as I would have more time and could keep more footage in the documentary.
The prep :
For this task I started off with many brainstorms to try and see what the documentary could focus on, I noticed that alot of the reoccurring topics such as faith, life in Ghana, coming to England etc all linked together and so my mum took us as the audience into a glimpse of her early life. Throughout the filming process, I first began by filming every day tasks, such as preparing the food, ordering food, doing the bin etc. I feel these shots really set the tone, especially with the different sounds that were brought about by the tasks.
The second filming stage was the interview in which my mum took us into her thought bubble. Often what I liked is at times my mum would say things that wouldn't always sound grammatically correct, but it indicated that she wasn't trying to be political but truly relaxed and authentic as she spoke to the audience. After this interview portion was finished, I then went outside or looked around my house for images that would align with what my mother talked about. For example, my auntie in Ghana sent us some images of my mum and her as children together which was briefly mentioned in the documentary. Also, studying Lewis Khan's "George Town" and his notes , I implemented some of his techniques into the documentary as well like the walking up and down the road, or even the lay over of images and videos on top of the audio.
I used a varying amount of tools on the editing software imovie, throughout the duration of the documentary. For example, I used the fade tool, the transition of fade to black, the stabiliser tool to counteract any shaky videos etc. The notes below connote what was broadly what was mentioned in the documentary

https://youtu.be/B-dfuNBPlFI
WWW: I adapted to Khan's style especially when looking at his notes I incorporated walking shots, mundane activity etc
EBI: Next time I would keep my focus on auto focus consistently instead of manual focus in order to obtain a higher quality
EBI: Next time I would keep my focus on auto focus consistently instead of manual focus in order to obtain a higher quality
Portraiture: interim Assessment.
Make sure to take care with your focus the selfie images are out of focus (A03) you are also missing the link artists for this section(A01). Your Myra Greene work is good and the photoshop work is strong (A02). However you have gaps in your darkroom knowledge and need to improve your focus and contrast. Your lighting workshop is missing images and you must go back over it and fill in the gaps. This is also the case with your documentary work; these sections all need to be completed. Your analysis is generally good and explains your process but your artist analysis needs to be more in depth (A01).
Make sure to take care with your focus the selfie images are out of focus (A03) you are also missing the link artists for this section(A01). Your Myra Greene work is good and the photoshop work is strong (A02). However you have gaps in your darkroom knowledge and need to improve your focus and contrast. Your lighting workshop is missing images and you must go back over it and fill in the gaps. This is also the case with your documentary work; these sections all need to be completed. Your analysis is generally good and explains your process but your artist analysis needs to be more in depth (A01).
